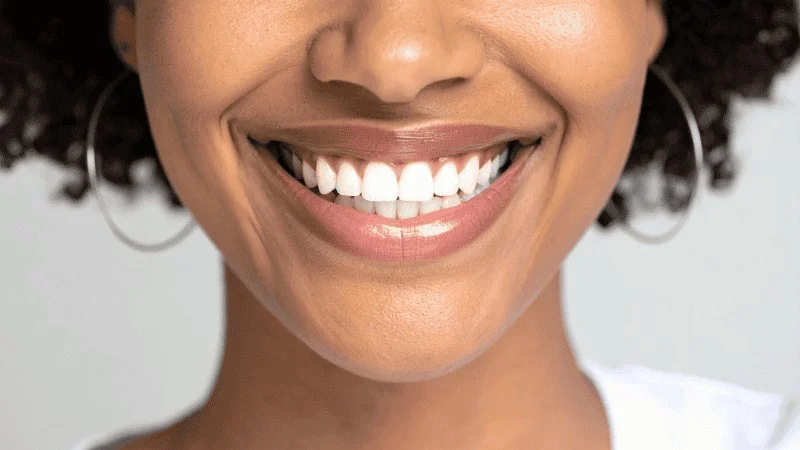
You want veneers that look like real teeth, not flat, bulky, or too white. You can achieve a natural look when you choose the right shape, select a shade that fits your skin tone, and follow a detailed smile makeover plan.
You get natural-looking veneers when your dentist customizes the shape, shade, and placement to match your face, bite, and natural teeth.
The right veneers blend with your features and reflect light like enamel. They should fit your smile line, support your lips, and match the color of your surrounding teeth. When you plan each detail with care, your smile looks balanced instead of artificial.
You also need a clear dental veneer process, from consultation to final placement. Careful planning, quality materials, and precise bonding help your veneers look real and last for years.
Key Takeaways
- Custom shape and shade help veneers blend with your face and natural teeth.
- Careful planning and smile design create balanced, realistic results.
- Proper materials and placement support a natural look and long-term wear.
What Makes Veneers Look Natural?
Natural-looking veneers depend on precise shape, correct shade, and careful smile design. When you control how light hits the porcelain and how the teeth fit your face, veneers look natural instead of obvious.

The Role of Shape, Shade, and Smile Design
Shape controls how your veneers blend with your face. Your dentist should study your lip line, gum levels, and how much tooth shows when you smile.
A proper smile design looks at:
- Tooth length and width
- The curve of your smile line
- The way your upper teeth follow your lower lip
- Small natural asymmetries
If teeth look too long, too square, or too even, they can appear artificial.
Shade matters just as much. Natural teeth are not one flat color. They have slight variation from the gum line to the edge.
Many cosmetic practices explain how careful planning improves dental aesthetics, such as this guide on what makes veneers look natural. The key is matching brightness to your skin tone and keeping the color believable.
When shape and shade match your facial features, your veneers support your smile aesthetics instead of overpowering them.
Natural Translucency and Light Reflection
Real enamel is not solid white. It has natural translucency, which allows light to pass through and reflect back softly.
If veneers are too opaque, they look flat. If they are too bright and solid, they can resemble plastic.
Modern porcelain veneers are designed to reflect light like real enamel. Surface texture also plays a role. Natural teeth have tiny ridges and grooves that break up light. A perfectly smooth surface reflects light evenly and can look artificial.
When your veneers copy the way enamel handles light, they blend into your smile instead of standing out.
Personalization vs. One-Size-Fits-All Approaches
One-size-fits-all veneers often lead to the “too perfect” look. Uniform size, uniform shade, and identical shapes rarely match real teeth.
You should expect customization.
A skilled dentist adjusts:
- Tooth proportions to fit your face
- Edge shape to match your age and style
- Shade depth to avoid an overly white result
Modern smile design also considers how your teeth look when you talk and laugh, not just when you sit still. Dentists who focus on matching veneer shape and colour to your smile often evaluate facial symmetry and lip movement.
When veneers are built around your features instead of a template, they look like your teeth at their best.
Choosing the Right Veneer Shape for Your Face
The shape of your veneers should match your facial proportions, tooth proportions, and smile line. When you align these details, you create a natural smile through harmony smile integration that looks balanced and fits your features.
How Face Shape Affects Veneer Design
Your face shape plays a direct role in choosing the right veneer shape. Dentists often adjust length, width, and edge contour to match your facial proportions.
If you have an oval face, slightly rounded veneers often look balanced. A round face may benefit from more angular edges to add contrast and definition.
For a square face, softer corners can reduce sharp angles. A long face may look better with slightly wider veneers to avoid making your face appear longer.
Custom veneers matter here. Your dentist should not use a one-size-fits-all template. Instead, they adjust each tooth shape to support your natural features, not fight them.
Tooth Proportions and Smile Line
Tooth proportions help your veneers look real. Most natural smiles follow a pattern where the central incisors are slightly longer than the lateral incisors, and the canines add gentle contour at the corners.
If the central teeth are too long or too square, your smile may look flat. If they are too short, your smile may look weak. Small changes of even 0.5 to 1 millimeter can change how your smile looks.
Your smile line also guides veneer design. When you smile, the edges of your upper teeth should follow the curve of your lower lip. This curve creates a soft and natural flow.
Details for a Balanced Natural Smile
Small details make veneers look natural instead of artificial.
Focus on:
- Edge shape: Slightly rounded edges often look more natural than sharp, flat edges.
- Surface texture: Real teeth are not perfectly smooth. Light texture helps reflect light in a natural way.
- Lateral incisor size: These teeth should not match the central incisors exactly. A slightly smaller width supports natural tooth proportions.
- Symmetry with variation: Your smile should look balanced, not identical on both sides.
Your dentist should design custom veneers that respect your facial proportions and smile line. When shape, proportion, and detail work together, your veneers blend in and support a confident, natural smile.
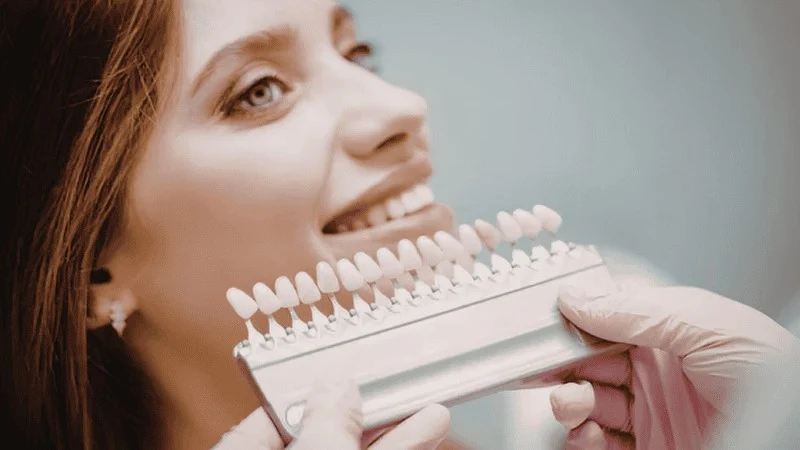
Selecting the Perfect Shade for Seamless Results
The right shade makes your veneers blend in instead of stand out. You need to look at skin tone, natural tooth color, and timing with teeth whitening before you lock in your veneer design.
Shade Selection Based on Skin Tone and Eyes
Your skin tone strongly affects how white your veneers should be. Very bright shades can look flat or fake against deeper skin tones, while softer whites may look dull on very fair skin.
Dentists often group shades by warmth and brightness. The goal is contrast that looks natural, not extreme.
Simple guide:
- Fair skin: light shades with neutral or slightly cool tones
- Medium skin: natural white with mild warmth
- Darker skin: brighter shades or warmer whites often look balanced
Your eye color also plays a small role. Cooler eye colors, like blue or gray, often pair well with neutral whites. Warmer eye colors, like brown or hazel, usually match better with slightly warm shades.
If you want a radiant smile, resist the urge to pick the brightest bleach shade right away. A balanced shade usually looks more natural in daily life.
Color Gradients and Matching Natural Teeth
Natural teeth are not one solid color. They have subtle changes from the gumline to the edge.
The base near your gums often looks slightly darker. The tips appear lighter and more translucent. Good veneer design copies this pattern.
Your dentist will check:
- The shade of nearby teeth
- The level of translucency at the edges
- Small variations in color across each tooth
If you place veneers on only a few teeth, precise shade selection matters even more. Even a small mismatch can stand out when you smile.
Porcelain veneers reflect light in a way that closely mimics enamel. Composite veneers can look natural too, but they may need more artistic layering to copy depth and translucency.
The Whitening-Timing Factor
You should always decide on teeth whitening before final shade selection. Veneers do not respond to whitening gel once placed.
If you plan to whiten, do it first. Then wait about two weeks before final shade matching. This pause lets your tooth color stabilize.
If you skip this step, your natural teeth may look darker than your new porcelain veneers or composite veneers later. That contrast can ruin seamless results.
Also remember:
- Porcelain veneers resist stains better than composite veneers.
- Composite veneers may pick up surface stains over time.
- Coffee, tea, and smoking can affect surrounding natural teeth more than veneers.
When you time whitening correctly and choose a stable shade, you protect your investment and keep your smile looking even and natural.
The Smile Design Process: Consultation to Final Result
You start with a clear plan built around your face, teeth, and goals. Your cosmetic dentist uses digital tools, lab support, and careful fitting steps to shape a smile that looks natural and fits your bite.

Digital Smile Design and Virtual Previews
You begin by meeting with a cosmetic dentist and sharing what you want to change. You talk about tooth shape, color, spacing, and how much of your teeth show when you smile.
Your dentist takes digital scans and high‑resolution photos. These records help guide expert smile design and prevent guesswork.
With digital smile design technology, you can see a virtual preview of your new smile before the veneer procedure begins. The software maps tooth length, width, and symmetry to your facial features.
This step helps you adjust details early. You can refine shade, edge shape, and proportions before any enamel removal takes place.
Collaboration with Dental Laboratory
After you approve the design, your dentist sends the digital scans and shade details to a dental laboratory. Clear communication here shapes the final result.
The lab uses your scans to craft custom veneers that match the agreed size and contour. Many labs rely on advanced materials such as porcelain that closely mimic natural enamel.
The planning phase follows a structured process similar to the one described in the smile design process behind veneers. It blends digital planning with hands-on artistry.
Your dentist may review digital mock-ups or wax models from the lab. This extra check ensures the veneers support both appearance and bite function before fabrication finishes.
Strong teamwork between your dentist and lab reduces remakes and shortens treatment time.
Veneer Application, Try-In, and Adjustment
When your veneers are ready, your dentist prepares your teeth. This step often involves light enamel removal, usually less than a millimeter, to create space for a natural fit.
You may wear temporary veneers while the lab completes your final set. These protect your teeth and let you test the look and feel.
At the try-in visit, your dentist places each veneer without permanent cement first. You review the color, shape, and alignment in a mirror and under natural light.
If needed, your dentist adjusts the fit or shade. Once you approve, the veneer procedure moves to bonding. A special adhesive secures each veneer in place.
After final polishing and bite checks, you leave with a smile transformation designed to look balanced, not artificial.
Material Choices and Veneer Placement for a Lifelike Finish
The material you choose and the way your dentist places each veneer both shape how natural your smile looks. Small details in translucency, fit, and bonding often make the biggest difference.
Porcelain vs. Composite Veneers
You can choose between porcelain veneers and composite veneers, and each option affects how light reflects off your teeth.
Porcelain reflects and transmits light in a way that closely matches natural enamel. Many dentists prefer it for patients who want the most realistic result. Porcelain also resists stains better than composite and keeps its surface shine longer.
Composite veneers use a tooth-colored resin that your dentist shapes directly on your teeth. This option usually costs less and requires less enamel removal. However, composite may stain over time and may not reflect light with the same depth as porcelain.
If you want the most enamel-like translucency and long-term color stability, porcelain often gives you a more natural finish.
Techniques for Precise Placement
Even the best material can look artificial if veneer placement lacks precision. Your dentist must prepare your teeth carefully and control every step of veneer application.
First, your dentist reshapes a thin layer of enamel. This step creates space so the veneer does not look bulky. Then they take detailed impressions or digital scans to design veneers that match your bite and smile line.
During placement, your dentist checks:
- Fit along the gumline
- Alignment with adjacent teeth
- Contact points between teeth
- Bite balance when you close your mouth
Many clinicians often place temporary veneers first so you can preview shape and length before final bonding.
Accurate veneer placement helps your restorations blend with your natural teeth instead of standing out.
Texture, Finish, and Final Bonding
Natural teeth are not flat or overly glossy. They have subtle ridges, faint lines, and slight variations in shine. Your dentist and lab technician add this surface texture to prevent a smooth, artificial look.
After checking fit and color, your dentist prepares your tooth surface and applies a bonding agent. They place the veneer with adhesive cement and use a curing light to harden the material.
The curing light activates the bonding resin and locks the veneer into place.
Finally, your dentist adjusts the edges and polishes the surface. This step refines the finish so your porcelain veneers or composite veneers reflect light like real enamel.
Careful veneer application, controlled bonding, and detailed finishing give you a smile that looks natural at close range and in bright light.
Longevity and Maintaining a Natural Smile
Your veneers should keep their shape, shade, and surface detail for many years. You protect your smile aesthetics by caring for the porcelain, the gum line, and the teeth underneath.

Routine Care and Stain Resistance
You care for dental veneers much like natural teeth, but you pay close attention to the edges near your gums.
Brush twice a day with a soft toothbrush and non‑abrasive toothpaste. Avoid gritty “whitening” pastes, which can dull the surface over time. Floss daily to remove plaque that collects along the margins.
Porcelain offers strong stain resistance, but it is not stain proof. Coffee, red wine, tea, and tobacco can darken the bonding edges or your natural teeth next to the veneers. That contrast can affect smile aesthetics even if the veneers stay bright.
Schedule cleanings every six months. Your hygienist uses tools that polish without scratching the porcelain and checks that the veneer margins stay smooth and sealed.
Protective Strategies for Veneered Teeth
You protect veneers by reducing pressure and impact.
If you grind or clench your teeth, ask for a custom night guard. Grinding can chip porcelain or loosen bonding over time. A thin guard spreads the force and protects both veneers and natural teeth.
Avoid biting hard objects such as ice, pens, or hard candy. Veneers handle normal chewing well, but sharp force at one point can cause cracks.
Use this quick guide:
- Do: chew with back teeth, wear a night guard, keep regular exams
- Avoid: opening packages with teeth, biting nails, chewing ice
Sports players should wear a mouthguard. One hit to the front teeth can damage several veneers at once.
When to Refresh or Replace Veneers
Most porcelain dental veneers last 10–15 years, sometimes longer with good care.
You may need a replacement if you notice:
- Chips or visible cracks
- Dark lines at the gum edge
- Gum recession that exposes the margin
- Changes in bite or looseness
Small chips often need simple polishing or repair. Larger fractures usually require a new veneer.
You might also refresh veneers for cosmetic reasons. If your natural teeth darken with age, the shade match can change and affect smile aesthetics. Your dentist evaluates the bond, gum health, and overall stain resistance before recommending replacement.
Frequently Asked Questions
Getting natural-looking veneers depends on careful shape planning, precise shade matching, and smart smile design rules. Small details like light reflection, spacing, and symmetry make a big difference in how real your smile looks.
How do dentists choose the right veneer shape for my face and smile?
Your dentist studies your face shape, lip line, and how much tooth shows when you smile. Longer, softer edges often suit round faces, while slightly rounded corners can soften square features.
Dentists also look at tooth proportion. According to how dentists match shape and colour, they design veneers to blend with your natural tooth form and smile pattern.
Digital smile previews and wax models may help you see the planned shape before treatment begins.
How is the veneer shade matched so it looks natural next to my real teeth?
Your dentist compares your natural teeth to a professional shade guide in different lighting. They also check brightness, undertone, and translucency, not just color.
Many dentists use digital tools to fine-tune the match. This step helps prevent veneers from looking too white or flat next to your real teeth.
What is the 3-3-3 rule for teeth, and how does it guide smile design?
The 3-3-3 rule focuses on the six front upper teeth. It groups them into three pairs: the two center teeth, the two next to them, and the canines.
Each pair should step down slightly in size from the middle outward. This gradual change creates balance and avoids a blocky look.
Dentists use this rule to keep your smile symmetrical but still natural.
Can veneers be made to look less “perfect” and more like natural teeth?
Yes, they can. Natural teeth are not flat or one solid color. Skilled dentists add slight texture, soft edge translucency, and tiny shade variations. Small differences in length and contour can also prevent a uniform, artificial look.
How many veneers do I typically need for a balanced, natural-looking smile?
Most people place veneers on the top six to eight front teeth. This area shows the most when you smile.
If you only treat one or two teeth, the color must match very closely. When several front teeth change together, the result often looks more even.
Your dentist will check how wide your smile is before recommending a number.
Do veneers look different in photos and bright lighting, and how can that be avoided?
They can look different under flash or strong LED lights if they are too opaque. Natural enamel has some translucency, especially at the edges.
Dentists reduce this risk by choosing layered porcelain and checking the shade in more than one light setting. When your veneers reflect light like real enamel, they look consistent in person and in photos.